

How To Make A Quilted Notebook Cover Youtube


These quilted journal covers brand quick and easy gifts also as being a great scrapbuster project!
I've made quite a few of these every bit Christmas and Birthday Presents.
Y'all tin can brand a quilted book comprehend in 1-2 hours depending on how much time yous spend on the quilting part and then it's a great quick end project and an achievable beginner quilting projection too.
I've used a quilt-every bit-you-go technique for these covers and so you'll be practicing that on a small scale too – a swell introduction for a beginner!
P.Due south. In that location is a video version of this tutorial at the stop of this post if you lot adopt!

Materials Needed – Quilted Journal Embrace
- Journal, Volume, or Notebook (you can apply hardback journals, a composition volume, or really any size notebook!)
- Quilt Batting (Run across measurement directions beneath) or Fusible Fleece
- Fabric Scraps in analogous colours
- Lining fabric (meet measurement directions below)
- Ribbons, buttons, elastic (optional)
Step i: Measure your book cover


The first thing you need to do is take a soft flexible measuring tape (the kind used to measure out a person's waist for example) and measure out your book around the spine from the edge of the front cover to the edge of the back encompass. That is your width.
And so apply your tape measure to measure the acme of the book forth the forepart encompass vertically. This is your height.
Cutting Instructions – Quilt Batting
Add 1″ to the width and 1″ to the height measured above. This is the size you desire the quilted panel that will plow into your periodical cover to exist.
Even so – equally we are quilting this panel, I recommend you add an boosted 1″ to each of those measurements and cut your quilt batting accordingly. You lot can trim information technology down when you have finished quilting.
Note: you can bandy out the batting for fusible fleece if you prefer.
- How to Join Quilt Batting Pieces – Apply your Leftovers!
Cutting Instructions – Lining & Flaps

Your lining or backing fabric should exist the same size equally your finished quilted cover. Then add that 1″ to the width and 1″ to the height of your journal or book that you measured earlier.
For the side flaps that keep the book cover in place, you need two pieces of fabric each the same height as your lining and quilted panel.
The width of each slice should be at least vii″ but it can be longer if y'all are covering a very large book or you similar a deeper flap. So anywhere betwixt 7″-10″.
You will fold these two flap pieces in half – so the actual size of your book comprehend flap will exist half of the width yous have cut.
Example:
- Book/Journal Cover Measures – 12″ x 8.25″
- Final Quilted Cover Panel needs to measure out xiii″ ten 9.25″
- Batting cut to approx fifteen″ x 11.25″ and trimmed downwards to thirteen″ x 9.25″ after quilting.
- Backing/Lining Textile cut to thirteen″ ten ix.25″
- (2) Flap Panels cut to 9.25″ x seven″ and folded in half.
Step two: Quilt Your Journal Cover
Delight notation that there is no quilted backing on this projection. We volition add the lining or 'backing' at a after step so yous should have just your slice of batting and a pile of your favorite fabric pieces in a mixture of squares and strips for this step.
If you lot want to keep things super uncomplicated you can of course cut one piece of fabric for your outer comprehend and but quilt information technology down to your batting.
Merely what I have done (as usual) is employ this project to use upwardly some fabric scraps!

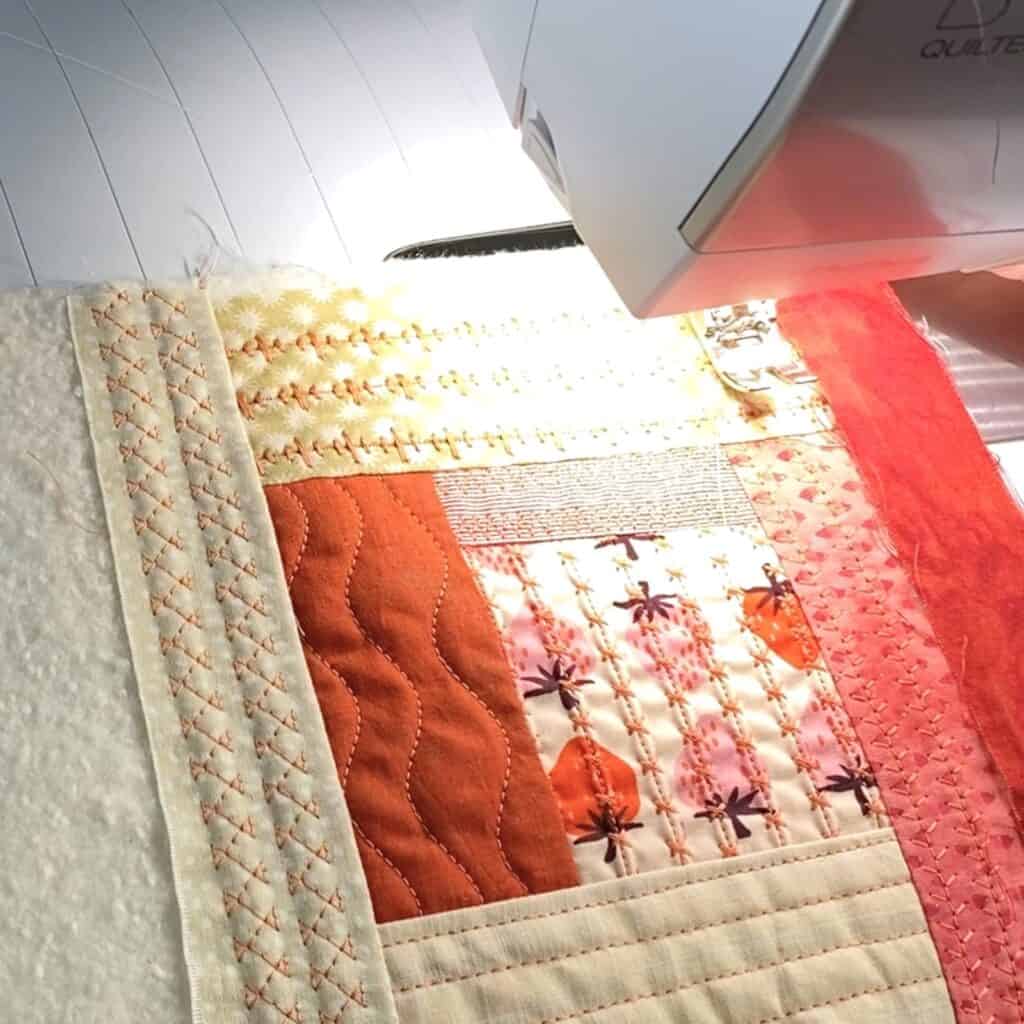
I start by placing one slice of material on the correct side of the batting (this will be the forepart cover of your periodical) and quilting it down.
Y'all tin can use directly lines, gratuitous movement quilting, or use a decorative stitch on your machine that you lot don't get many chances to utilize.

I tend to focus on the front comprehend area kickoff and then movement towards the back cover.
This is a great opportunity to employ a precious last piece of that special fabric or to fussy cut an element from a piece of textile with a large impress.
Once your first piece is quilted downward you lot are just edifice on this.

Find a 2nd piece that is the aforementioned width or superlative and place information technology correct sides together with the first slice.
Sew with a one/four″ seam allowance. You exercise not need to backstitch as you lot will exist sewing over each seam line.

Flip open the slice you lot just sewed and quilt information technology downwards equally you did the showtime slice.
Yous can utilise direct-line quilting or vary your stitches for each scrap!
The easiest fashion to do this is to build upwards with smaller scraps (or outset with one big scrap) that virtually covers the right side of your batting, then add strips to fill up up the other side of the batting and utilise one long strip for the superlative and i for the bottom to visually tie the two sides together ( this is how I did the journal with the swallow on the cover – see finished photos beneath).
Simply there are so many means you tin do this. Here are the key things to remember:
- The right hand side of the batting as it faces y'all (held landscape) will be your front end comprehend and the left hand side volition be the dorsum encompass.
- You need to roughly program your scrap placement to make certain you are sewing over the raw edges and seams of the pieces you lot quilted down starting time.
- Try not to accept too many seems meeting at the edges of your panel as you lot'll be stitching over that again to adhere the flap and the lining.
- Simply this is a smashing project for just playing and having fun with your leftover scraps. Whatever you make tin't help but expect arty and totally 1 of a kind!
When your entire piece of batting has been covered and quilted – trim it downward to the size above – ane″ wider and 1″ higher than the size you measured your journal to be.
Step iii: Adhere the Journal Cover Flaps
The flaps are the bits on the side that keep your book, journal or notebook within your cover – sometimes called a book sleeve.

Have the two pieces yous cutting as described to a higher place and fold them in half wrong sides to wrong sides (and then you can see the right side of the cloth on the outside).
Place the raw edge of that folded slice of material along the side edges of each end of your periodical cover (the short edges).
Your folded edge for each flap should exist facing each other and pointed towards the middle of your book cover.
Meet beneath for how to add a ribbon closure – do this BEFORE sewing downwards your flaps.
Sew down each raw edge with a 1/4″ seam allowance, backstitch at both ends.

Optional: I have fabricated these flaps a scrap stiffer occasionally by using fusible interfacing. I usually don't employ it equally it is an extra step and not strictly necessary, only if you call back you would prefer your flaps to feel a fleck more rigid yous can apply some medium weight fusible interfacing – fuse information technology to just i side of your folded flap and cut the layer of interfacing ane/two″ smaller effectually the seam lines of your flap so you don't create actress bulk!
Optional Extras
Ribbon Closure
If you would like to insert a ribbon closure or a bit of elastic to close this is the time to do information technology.
I similar to add together ribbons.


Take ii pieces of ribbon that are long enough that you could necktie them together into a bow and identify 1 end of each at the. middle of your front and back embrace aligned with the raw edge of your panel.
Place the flaps on top as described above and pin in place.
Then go along with attaching the flaps as described higher up. I like to backstitch over the spot where the ribbon is when I attach my flaps before continuing to the opposite side.
Ribbon Bookmark
If you lot want to add together a ribbon bookmark you lot will do this in a similar way as with the closure except that you volition pin a long length of ribbon in the middle of your cover at the top edge (long side) in between the quilted cover panel and the lining (run into adjacent step).
Embellishments
If you would like to add any embellishments onto your journal cover now is the fourth dimension to practice it.
Examples of things you could add:
- Buttons
- Bits of Ribbon or Lace
- Cuttings from Selvedge Edges (encounter black and white cover below for case)
- Labels
- Applique
Adhere annihilation you lot like to make your cover more unique, simply do this all before attaching the flaps and lining and exist sure to keep any bulky embellishments away from the edges of your cover where you volition need to be able to sew together airtight to stop.
More Quilted Gift Ideas:
- How to Make a Quilted Wall Hanging from Scraps (Quilt-As-You-Go)
- Modern Quilt-As-Y'all-Get Scrappy Coasters
- Mini Quilt-as-y'all-go Keychain
- Making a Quilted Appearance Calendar from Scraps!
- Baby Colour Book from Scraps
- How to make a Bit Textile Bookmark from Teeny Tiny Trimmings
Stride iv: Attach the Periodical Cover Lining
We are almost done!

Next you lot demand to fold your flaps and ribbon into the eye of the console again and place your slice of lining fabric right side down on top.
Y'all should be looking at the wrong side of your lining when you bring this over to the sewing machine to sew information technology down.
Run up all the manner around with a 1/4″ seam allowance – leaving a 2-iii″ gap for turning. I like to place the turning gap forth the bottom edge in the middle in betwixt the two flaps.
Trim corners and whatever bulky seams before turning your cover right side out.
Footstep 5: Finishing Touches
Employ a chopstick or other pointy simply blunt point turner tool to push button your corners out.

Fold the raw edges of your turning gap in and pin or clip to hold in place.

Press your book cover and then everything is lying flat.
Topstitch as shut to the border of your journal cover every bit you can get making certain to catch both sides of the turning gap in your run up to close the gap.

If you lot have attached ribbons make certain they are pulled out abroad from the cover before you lot do this!
Finished Quilted Periodical Cover using Bit Fabrics!
Finished! Encounter the video below if y'all aren't sure how to slide your book inside or if you want to run across any of the steps in more than detail.
Below are some examples of the quilted journal covers I've been making recently. Mine were all made with an a5 size note-book (hardcover style journal) merely follow the instructions above and you can brand yours any size book you like!


These quilted fabric notebook or journal covers are an like shooting fish in a barrel project and make great gifts and are a great way of using upwards scraps and letting yourself become artistic.
Printable Instructions and Video Tutorial
Agile Time: one hour
Total Time: 1 hour
Difficulty: Beginner Friendly
Estimated Cost: $2-5
Use your fabric scraps to make a quilted journal cover. Measurements and instructions to make a cover that fits any size volume, journal or notebook.
Materials
- Fabric Scraps - Crumbs & Strips
- Quilt Batting or Fusible Fleece
- Quilting Cotton wool for Lining and Flaps
- Ribbon (optional)
- Interfacing (optional)
Tools
- Sewing Machine
- Rotary Cutter
- Cutting Mat
- Flexible Measuring Tape
Instructions
- Mensurate the exterior of your journal or book with a flexible measuring record - measure the width from edge to border around the spine and from the height to the bottom of the front embrace.
- Add 2" to each measurement and cutting your quilt batting or fusible fleece to this size.
- Cut ane piece of lining fabric that is i" larger than the height and width measured in step 1.
- Cut 2 pieces of fabric for your inner book sleeve flaps. These should be the same peak as the lining fabric in step 3 but the width should be 7-ix" each. Fold these in one-half with the correct side facing out.
- Have your batting or fusible fleece and quilt it until it is covered using the sew together and flip quilt equally you go method (see video tutorial).
- When your quilt batting is completely covered trim down to the aforementioned size as your lining cloth.
- Identify the folded flap pieces ontop of the right side of our quilted panel with raw edges together (folds towards the centre).
- If using a ribbon closure insert it in between the quilted panel and flaps.
- Run up flaps downwards along the raw edge only with a 1/4" seam allowance. Bacstitch over ribbons if using them.
- Identify lining textile right side downward on height of the quilted panel and flaps. Sew all the way around with a 1/4" seam allowance leaving a two-3" turning gap.
- Turn your embrace right side out, bringing the flaps to the back of the cover.
- Press flat and topstitch around the border to close the turning gap and finish off. Be careful which way your ribbons are pointing if y'all have used them.
- Insert your volume cover in the flaps! Finished!
Source: https://scrapfabriclove.com/how-to-make-a-quilted-journal-cover-any-size/
Posted by: jonesfinerstaide.blogspot.com
0 Response to "How To Make A Quilted Notebook Cover Youtube"
Post a Comment